• Skip to primary navigation
  • Skip to main content
  • Skip to primary sidebar
  • Recipe Index
    • Breakfasts
    • Appetizers
    • Soups
    • Main Dishes
    • Side Dishes
    • Lunches
    • Air Fryer Recipes
    • Salads
    • Sandwiches
    • Breads
    • Cookies-Bars
    • Desserts
    • Holidays
  • Top 10 Recipes
  • Kid’s Recipes
  • Freebies
  • FDA
  • Meet Carole

My Kitchen Escapades

menu icon
go to homepage
  • Recipe Index
    • Breakfasts
    • Appetizers
    • Soups
    • Main Dishes
    • Side Dishes
    • Lunches
    • Air Fryer Recipes
    • Salads
    • Sandwiches
    • Breads
    • Cookies-Bars
    • Desserts
    • Holidays
  • Top 10 Recipes
  • Kid’s Recipes
  • Freebies
  • FDA
  • Meet Carole
search icon
Homepage link
  • Recipe Index
    • Breakfasts
    • Appetizers
    • Soups
    • Main Dishes
    • Side Dishes
    • Lunches
    • Air Fryer Recipes
    • Salads
    • Sandwiches
    • Breads
    • Cookies-Bars
    • Desserts
    • Holidays
  • Top 10 Recipes
  • Kid’s Recipes
  • Freebies
  • FDA
  • Meet Carole
×

Home » Wedding

Published: Nov 20, 2013 · Updated: Nov 11, 2022 by Carole Jones · 8 Comments

Large Paper Snowflake Tutorial

Now, I recognize that unless you happen to get married in the winter, this particular tip won’t work. However, these are just too gorgeous not to share so whip some up for your Holiday decorating instead!  These sparkly snowflakes make quite a statement because they are quite big and measure 22 inches across.  You can make a smaller version of these by using smaller squares of paper but I love the big ones because they make a statement!  Plus, these only take 6 sheets of paper and some glue to make.
Large Paper Snowflake Tutorial
For my daughter’s wedding reception, we are draping the walls and the ceiling with organza and will have a ton of these hanging down from the draped material on the ceiling.  We have a few other surprises for the ceiling as well, but you will have to come back for those!

To begin, use a standard 8.5 x 11 inch sheet of paper.  I made ours from a shimmery silver paper to go with the theme, but you can certainly use plain white paper as well.   Glitter paper would rock!  I would not use card stock though because it would be too thick to bend as needed, especially when glueing all six parts together.

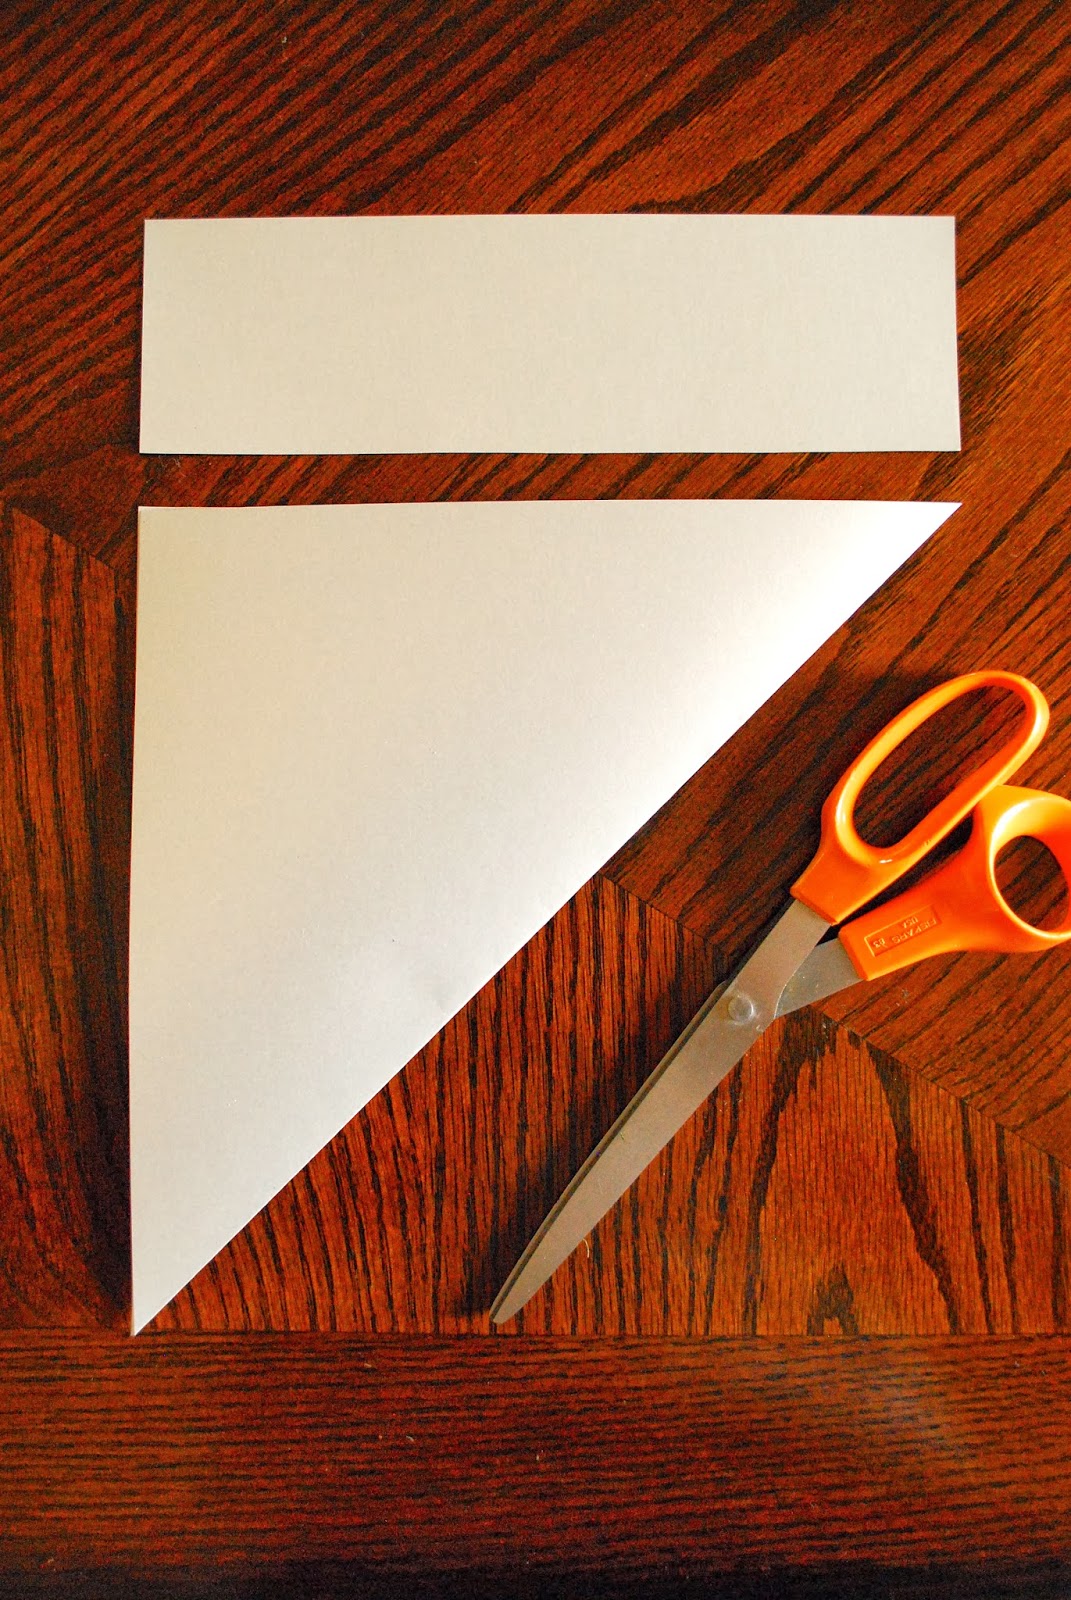
Fold up one corner of the paper, crease and cut off the excess paper.  You can discard the extra piece.

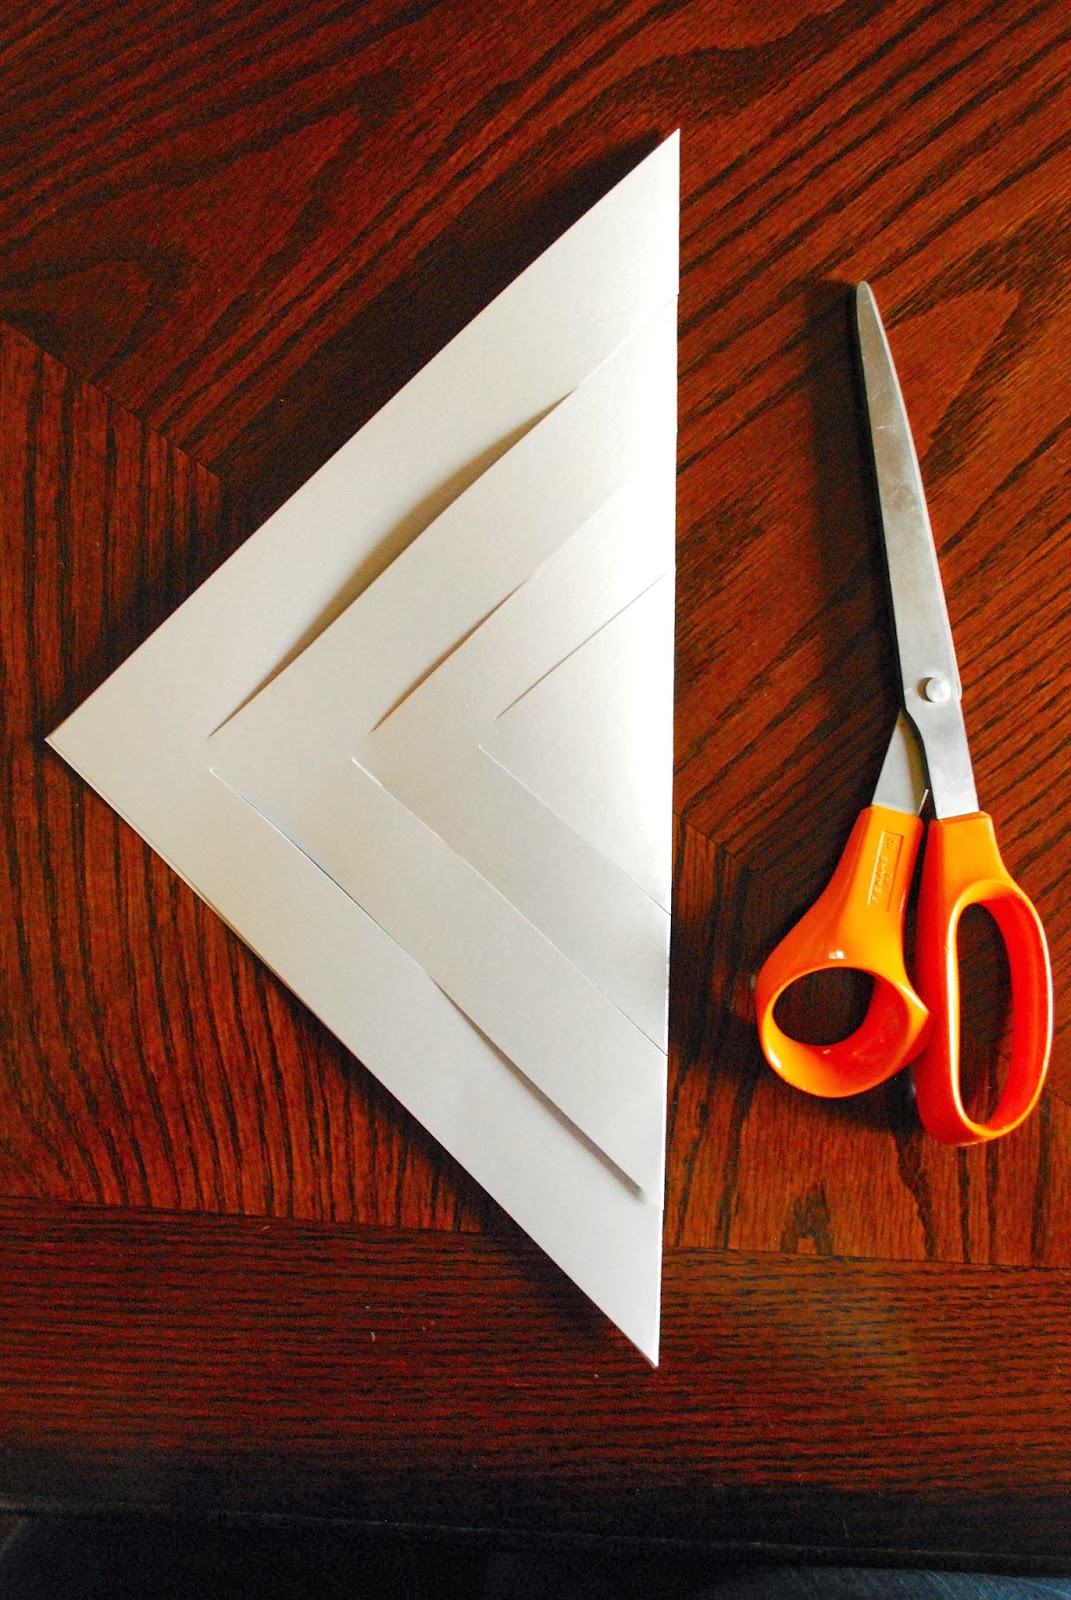
Use scissors to cut the six cuts as shown above, beginning on the folded edge.  Be sure you do not connect your two cuts in the center or you will have to start over 🙂  I left about a shy 1/2 inch between my cuts down the center.  Don’t worry about being exact or even with your cuts.  Just eyeball it.

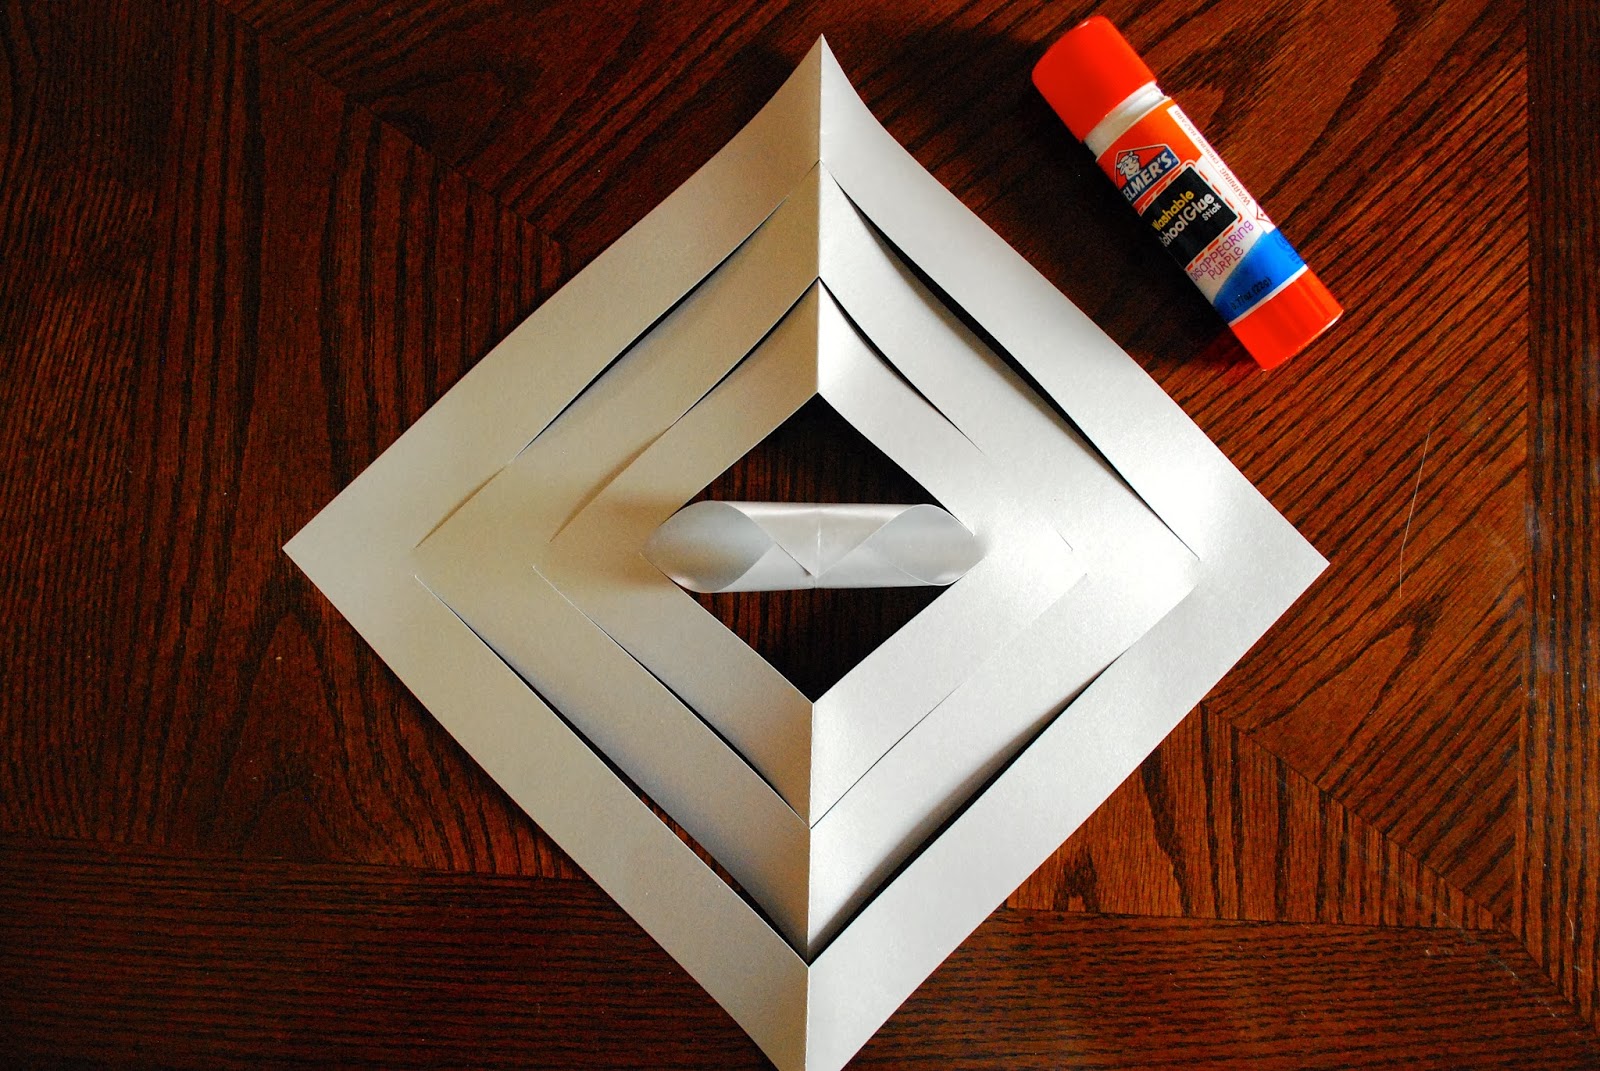
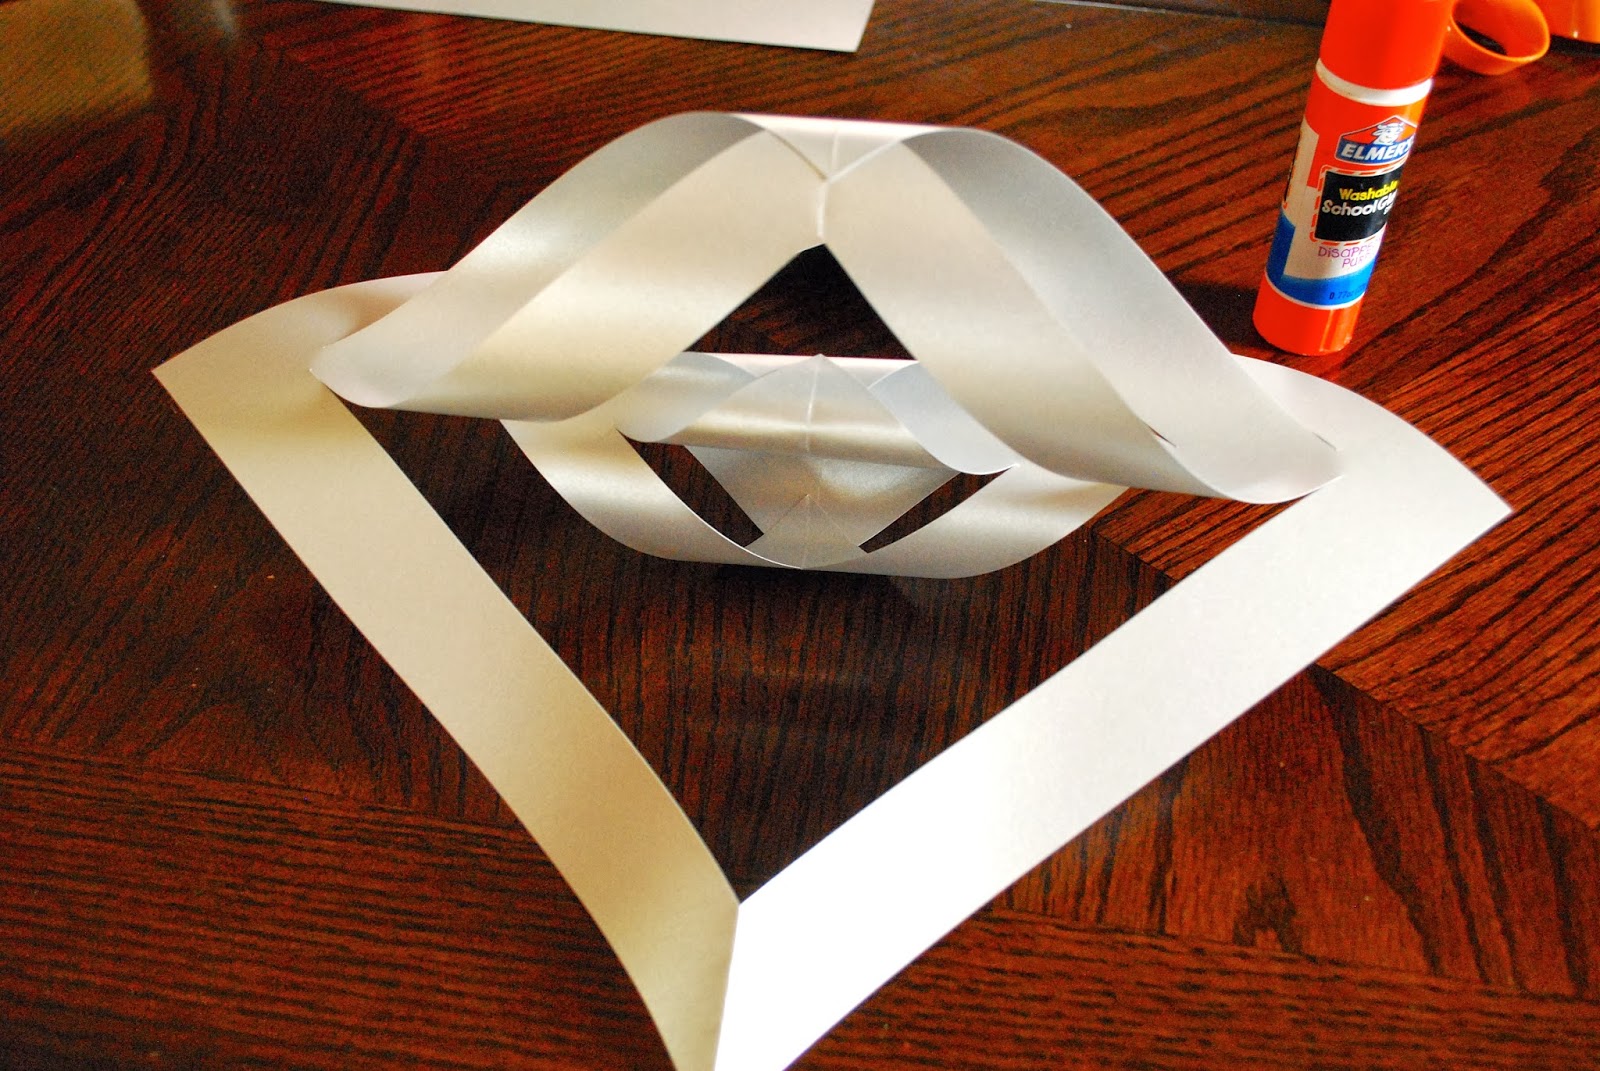
Open your square and starting in the middle, apply glue stick to both points of the center diamond into a loop and hold until they stay firmly.  My shiny paper took a bit of extra glue and patience because they did not like staying together very well.  You could also use staples if you are ok with a few staples showing.

Flip the diamond over so the loop you just glued is face down on the table.  Take the two points of the next diamond and glue together just like before.

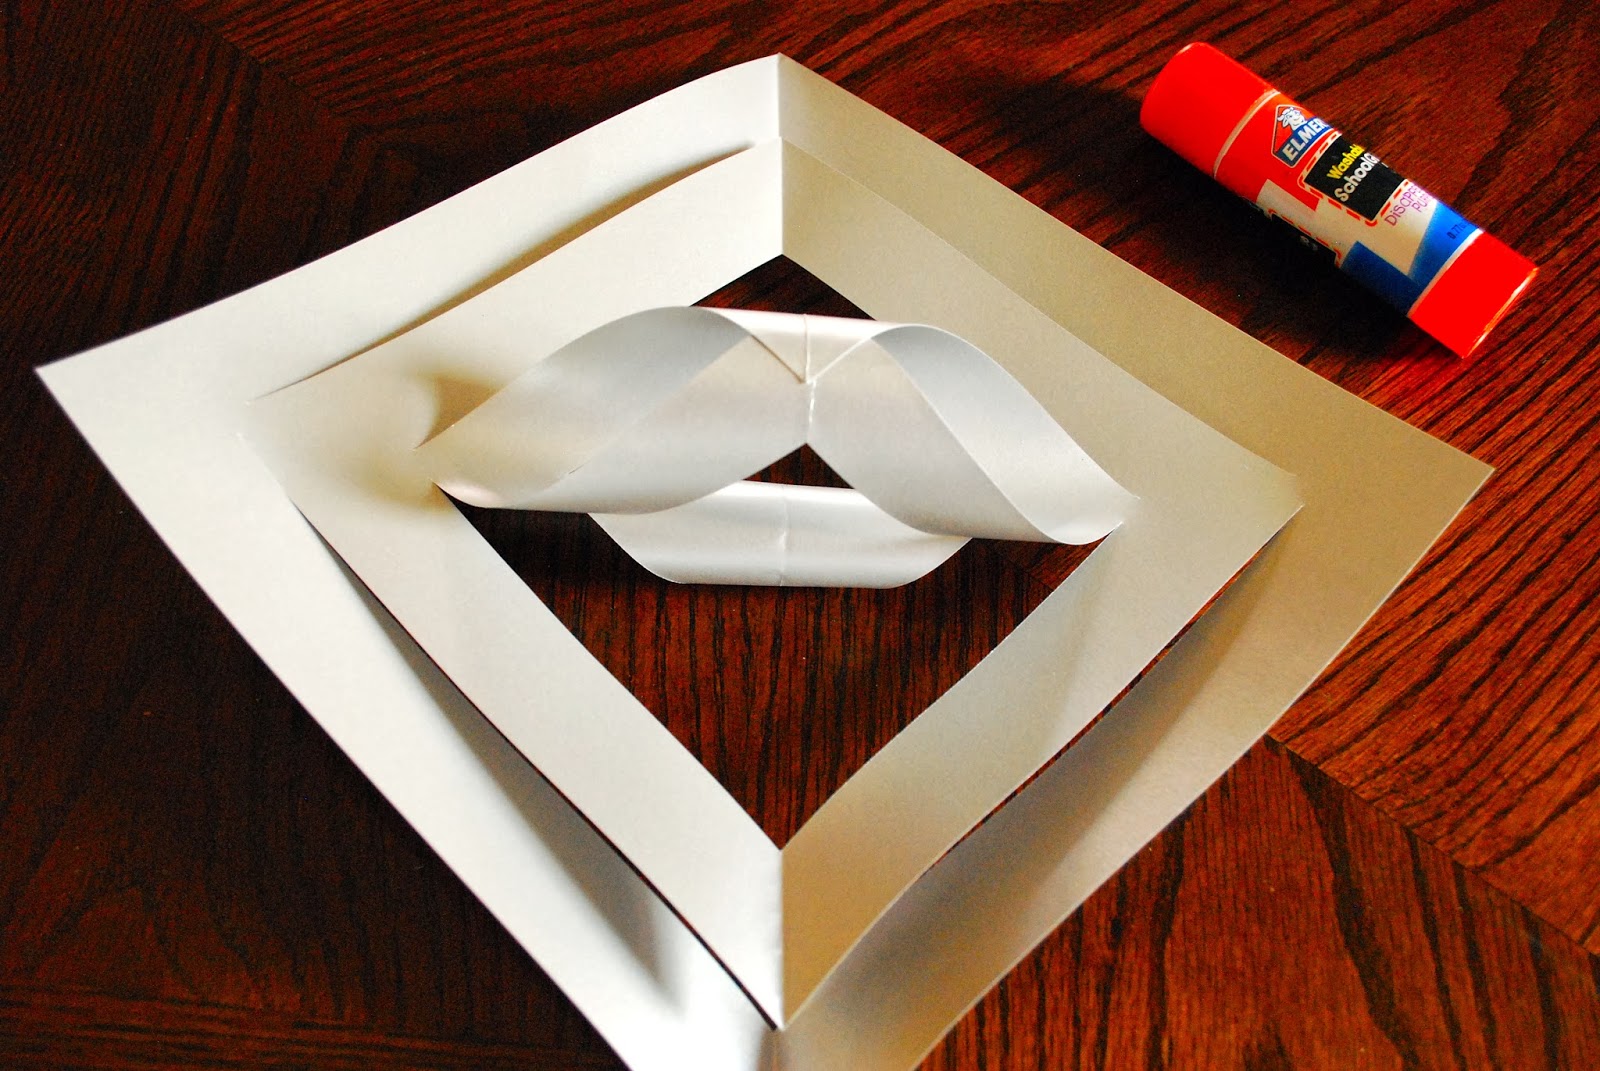
Flip the diamond over once again, and glue the tips to the next diamond together.  Be sure you hold them firmly until they stay put!

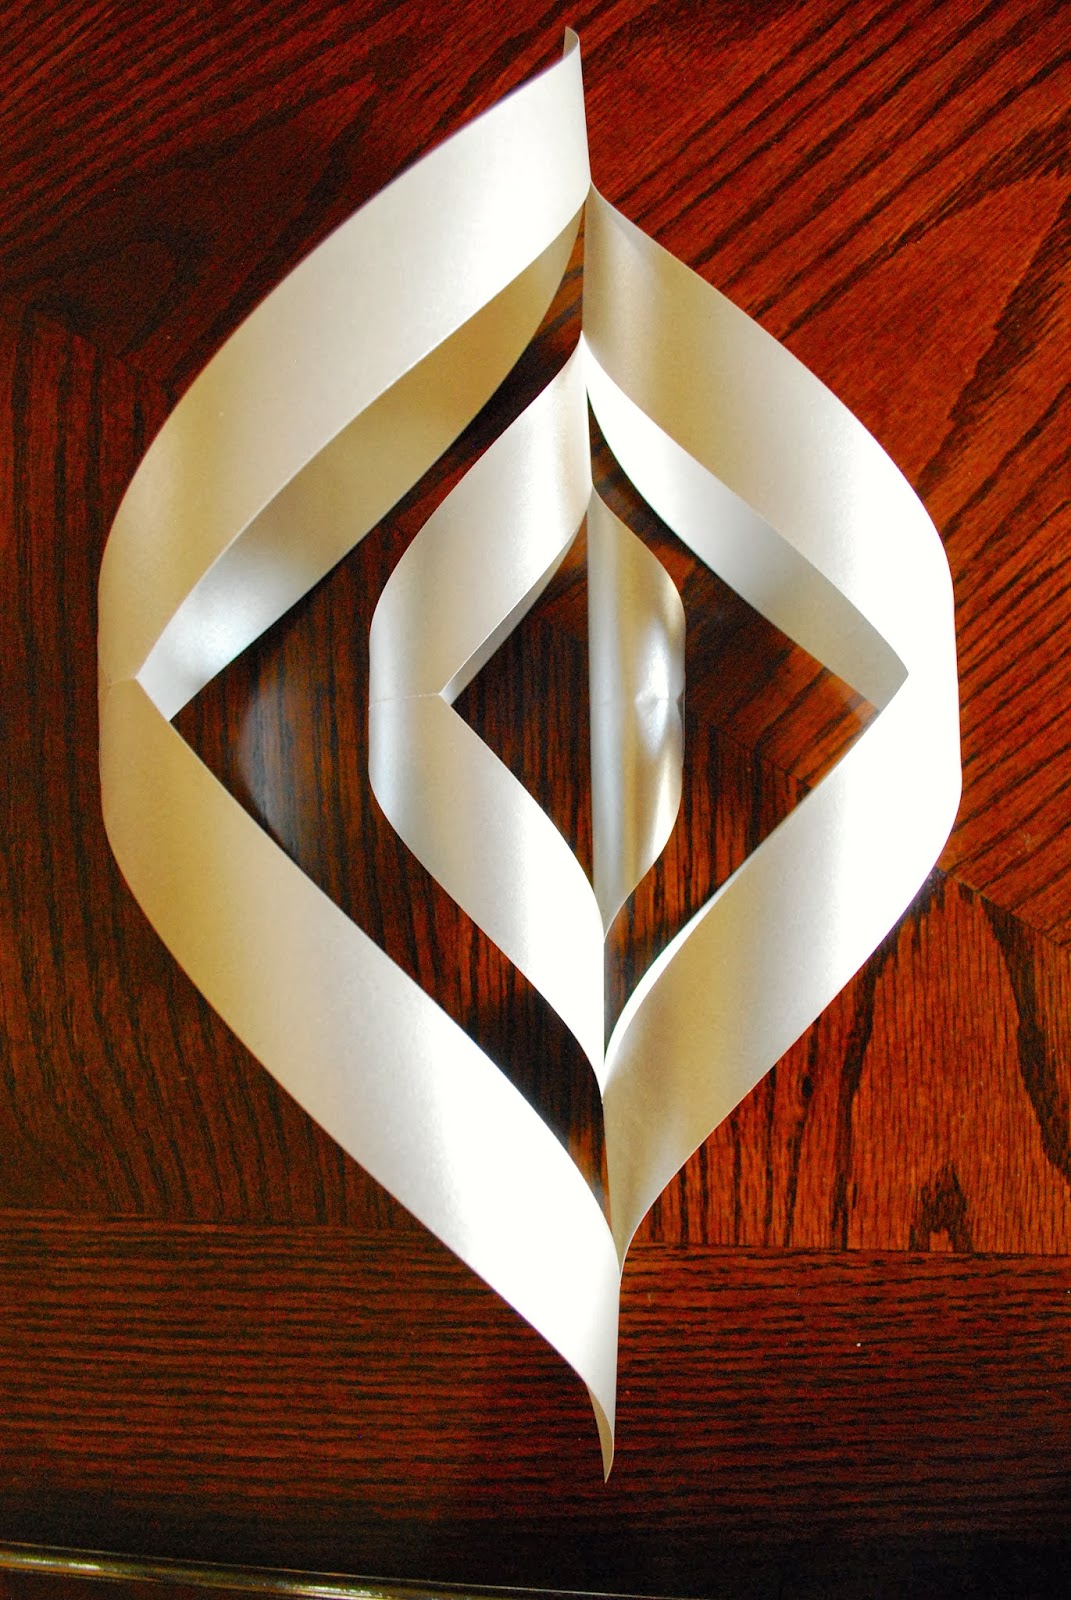
Now one last flip to glue together the last tips of the outermost diamond.

Complete the above process five more times so you have 6 complete sections.  I even think these are pretty all on their own!

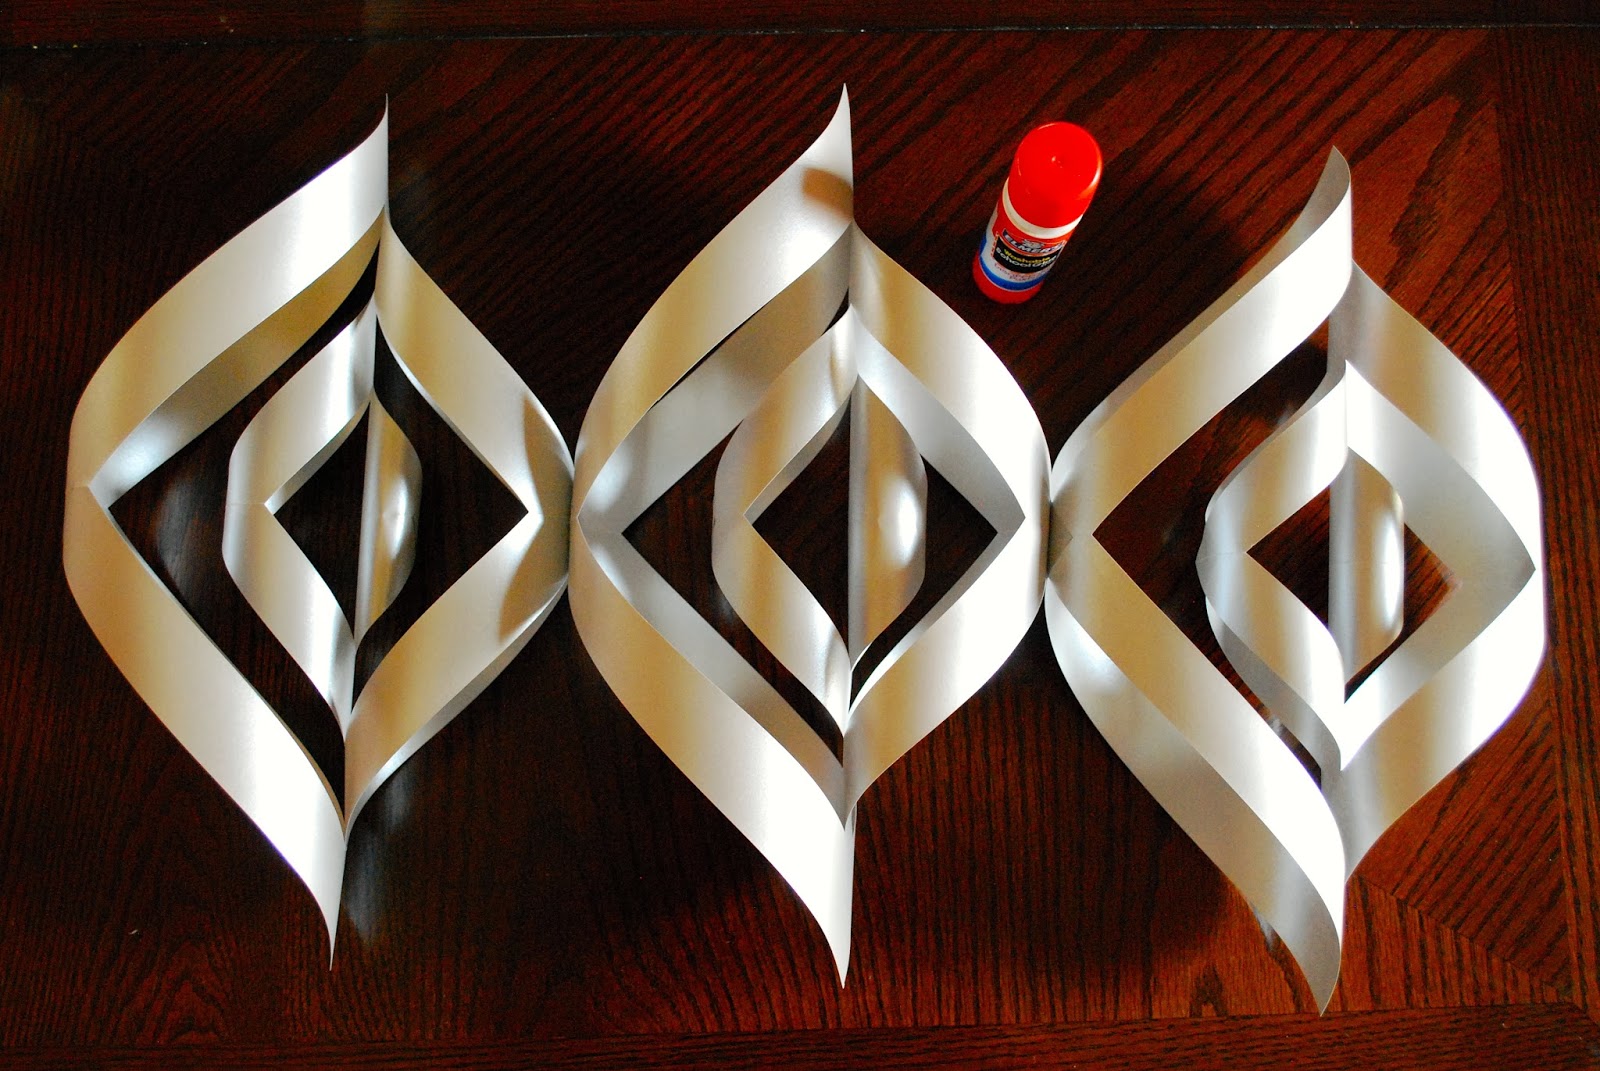
Line up three of your sections so they are all the same direction and apply glue to the two center points where they meet.  Hold them firmly together and allow them to dry for a few minutes.  You want to be sure they are completely dry before moving on or they will pop apart.  Repeat with the remaining three sections.

Apply glue to the bottom points of the three sections and hold them firmly together for a few minutes.  Again, allow them to dry completely before moving on or they will pop apart!  Repeat for the other grouping of three.

You should now have two groupings of three as shown above.  Apply glue to the two center points in the middle, as well as where the two sections touch on each side.  Hold firmly until dry.  Use a paper punch to place a hole in the top so you can hang your gorgeous creation!

Large Paper Snowflake Tutorial


Categories: Wedding

Filed Under: Wedding
8 Comments

About Carole Jones

Carole Jones is an Arizona-based cookbook author & food blogger. She's authored The 30 Minute Cooking From Frozen Cookbook and the self-published Take 5: Chicken e-cookbook. For the past 15 years, Carole has shared her culinary adventures cooking and baking for her six brutally honest children here on My Kitchen Escapades. Hot, crusty bread is Carole's love language, but her two adorable grandchildren are a close second. Yes, second. Don't judge.

  • Facebook
  • Instagram
  • Pinterest
  • Twitter
  • YouTube

Reader Interactions

Comments

  1. Minnesota Prairie Roots says

    November 20, 2013 at 1:41 pm

    Reminds me of my childhood days of folding and cutting out snowflakes, although these are much more elegant. Much more.

    Sounds like you have a gorgeous setting planned for the reception. Be sure to show us all the final results.

    I expect you are feeling the pressure now and the count-down is on.

    Reply
  2. Ann says

    November 21, 2013 at 4:40 pm

    We made some today. These will be up around the house all winter long. Thanks for the tutorial, Carole! We’ve also made your pork carnitas. Yum!

    Reply
  3. Carole says

    November 21, 2013 at 6:28 pm

    So glad you made them Ann…and the Pork Carnitas are in my top five of favorite recipes 🙂

    Reply
  4. Heather Maillett Burkhardt says

    December 17, 2014 at 8:53 am

    Used this in my classroom – turned out great – Thanks

    Reply
    • Carole says

      December 17, 2014 at 12:18 pm

      Heather – great idea for a classroom project and I am glad they worked for you! -Carole

      Reply
  5. olja says

    December 01, 2015 at 4:11 am

    Omg we were making these snowflakes in school about a week. It’s super easy to make! 🙂

    Reply
  6. Jane says

    January 01, 2016 at 7:02 pm

    Any suggestions of preserving them?

    Reply
    • Carole says

      January 01, 2016 at 7:44 pm

      The only way would be to pack them in a hard sided box and not to compress them when packing.

      Reply

Leave a Reply Cancel reply

Your email address will not be published. Required fields are marked *

Primary Sidebar

Hey there my friend! I’m Carole Jones, a momma to 6 crazy kiddos and honestly, I’m just trying to get my kids to eat something that isn’t chicken nuggets and french fries.

More about me →

FOLLOW CAROLE ON YOUR FAVORITE SOCIAL MEDIA

  • Facebook
  • Twitter
  • Pinterest
  • YouTube
  • Instagram
  • TikTok

Recent recipes

  • coconut jasmine rice
    Coconut Jasmine Rice
  • air fryer zucchini
    Air Fryer Zucchini
  • Shrimp Quesadilla
    Shrimp Quesadilla
  • Air Fryer Potato Wedges
    Air Fryer Potato Wedges

Popular recipes

  • Roasted Baby Potatoes
    Roasted Baby Potatoes
  • Thai Chicken Salad
    Chopped Thai Chicken Salad with Peanut Dressing
  • vegetable pasta bake
    Cheesy Vegetable Pasta Bake
  • parmesan chicken bake
    Parmesan Chicken Bake

Footer

FREE MEMBERSHIP for you weekly recipe fix


Top 5 Most Read Recipes

Pork Carnitas

Old Fashioned Donut Muffins

Parmesan Chicken Bake

Chicken Cordon Bleu Casserole

Sushi Rice Recipe


Follow Carole on Your Favorite Social Media

  • Facebook
  • Twitter
  • Pinterest
  • YouTube
  • Instagram
  • TikTok

Recipes

Breakfast

Appetizer

Soup

Main Dish

Side Dish

Lunch

Air Fryer

Salad

Sandwich

Bread

Dessert

Grab my newest cookbook here!

30 Minute Cooking from Frozen Cookbook

My blog contains affiliate links, which means I receive a small compensation if you make a purchase using my link, at no additional cost to you. And no worries, I only link to products that I both use and love! ~ Carole


Top 10 Recipes | Privacy Policy | About

Copyright © 2023 My Kitchen Escapades