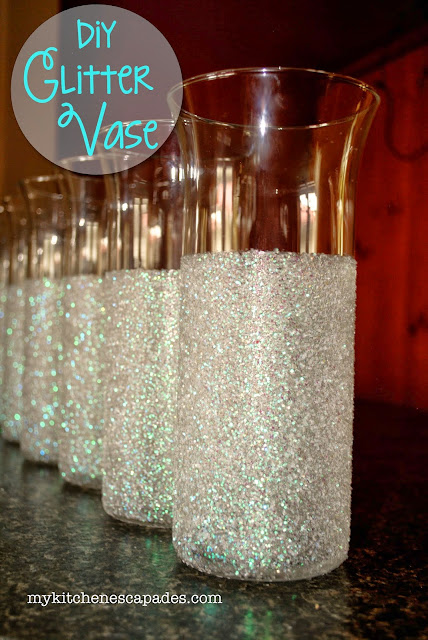
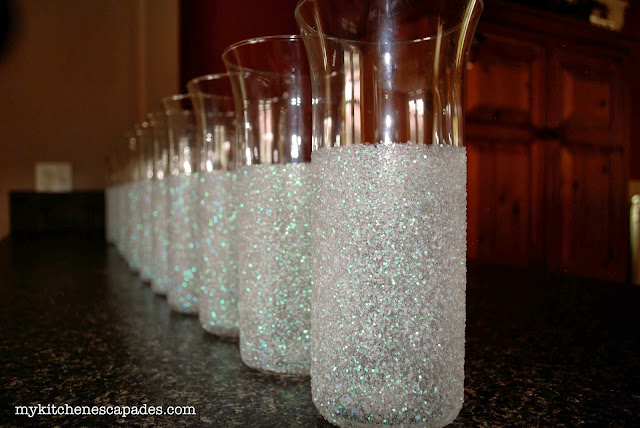
A glitter vase makes an inexpensive and easy decoration idea for both a wedding or Christmas DIY centerpieces. Make your centerpiece glass vase using either one you already have on hand or Dollar Tree vases, along with some glitter and Mod Podge. The end result is stunning! Make your party or holiday event look fabulous. Scroll down to see them lit from the inside with tea lights!
Why I Love This Glitter Vase
For my daughter’s wedding, we wanted to incentivize her to stay on budget and allow us to DIY most of her decor. To do so, we set her a very modest budget for the whole wedding. Next, we told her whatever she did not spend, we would double and give to her as cash. We felt it allowed her to use her creativity to stretch a dollar and give her the opportunity to start off her marriage with a bit of extra cash in savings. She did an amazing job! And, you’ll find many of the projects we did to save money here on the blog.
Since my daughter’s wedding theme was “Winter Wonderland,” you will see many pieces that sparkle and shine like this glitter vase tutorial! Even if your event has a different theme, you will find most ideas in the budget wedding series can easily be used no matter the color scheme or season. In fact, I’ve carefully packed away all of the wedding decor since there are 5 more kids behind my daughter. I know they will be flexible enough to work in any wedding or party setting.
Vases for Centerpieces
We all know those table centerpieces are the major statement piece for a wedding reception. So, this is where a little extra effort and detail will pay off. It will come by the number of compliments and comments your guests make. They will be staring at them much of the evening, so give them something beautiful to look at, besides the happy couple of course!
I saw this idea over on Organize Your Stuff Now and knew they would be the perfect treatment for the centerpiece vases. I bought 12 cheap vases at the Dollar Tree, then some matte-finished Mod Podge and glitter. You will have both Mod Podge and glitter left over, but don’t worry…..I will show you how to use your leftovers in other wedding decor posts!
What is a Glitter Vase
A glitter vase is a decorative vase that is usually made from an inexpensive glass vase that is covered in any color of glitter using Mod Podge. It is often used as a centerpiece for weddings or parties and looks beautiful with lights or candles inside.

How To Make a Glitter Vase
Simplicity is key for making a glitter vase. Go to the Dollar Tree and grab an inexpensive glass vase if you don’t have one on hand.
Time needed: 2 hours
How to Make a Glitter Vase
- Select and clean the glass vase
It’s important for the vase to be clean so the glitter will stick properly.
- Use painter’s tape to cover anywhere you don’t want glitter on the vase.
Be cautious and be sure the lines are level and press down well to create a tight seal so it doesn’t leak.
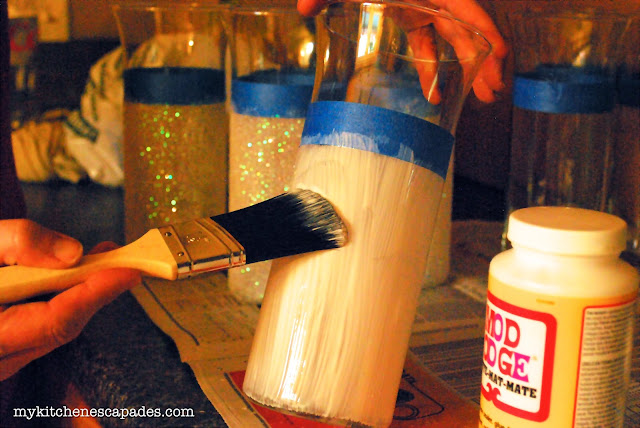
- Apply the Mod Podge all over the outside of the vase.
The Mod Podge will go on white but will dry completely clear.
- Apply the glitter
Do this over a sheet of paper so you can collect and reuse any glitter that falls off the vase.
- Allow the vase to dry
This can take about 1-2 hours depending on the climate inside your home.
- Seal the glitter with a top coat
Thin the Mod Podge with some water and gently apply it over the top of the glitter.
- Remove the painter’s tape
If you wait to do this until the topcoat dries, you risk removing glitter from the vase.
- Allow the vase to dry
It is best to let the finished glitter vase to dry overnight.
Step-by-Step Directions
Step One
To begin these glitter vases, Use any type of masking tape and tape off where you want your glitter to end. Use your fingernail to press down the edge of the tape firmly so the glue won’t leak under the tape. If you have more patience than me, you could also do some fun stripes instead of solid glitter. That was my initial plan but as you can tell by my dark pictures, my day was drawing to a close and I needed to be quick! No stripes for me. Oh well.
Step Two
Use a brush loaded with Mod Podge and cover the vase with glue. Don’t worry that it is white because it dries clear. When you are applying the Mod Podge close to the tape, only brush down into the glue area and not up into the tape. Again, we are trying to keep the glue from leaking under the tape where we don’t want it!
Step Three
Lay down a clean piece of paper and generously cover the glue area with glitter. Gently knock the vase on the work surface and look for areas that are thin or missing glitter then add some more. Carefully pour the excess glitter back into your glitter container from your clean piece of paper. Set the vase aside to dry. You will know when the Mod Podge is dry because it will dry clear and all you will see is the glitter.
Step Four
Once the Mod Podge has dried, add a bit of water to a small bowl of Modge Podge to thin it out. You need this layer thinner so it will be easier to spread over the glitter. Again, load your brush with the thinned Mod Podge and cover the glitter with a thin layer. Remove the tape after this second layer has been applied, before the glue dries. This second layer will keep any glitter from falling off the vase, and again, don’t worry because it dries completely clear.

Glitter Vase FAQs & Troubleshooting
To put glitter on a vase, you need some Mod Podge to allow the glitter to adhere to the surface but will dry completely clear so the glitter will be the star. After the glitter is completely dry, you’ll need to thin out some Mod Podge with water and use it as a topcoat over the whole vase to keep the glitter from falling off.
Can I use any color of glitter?
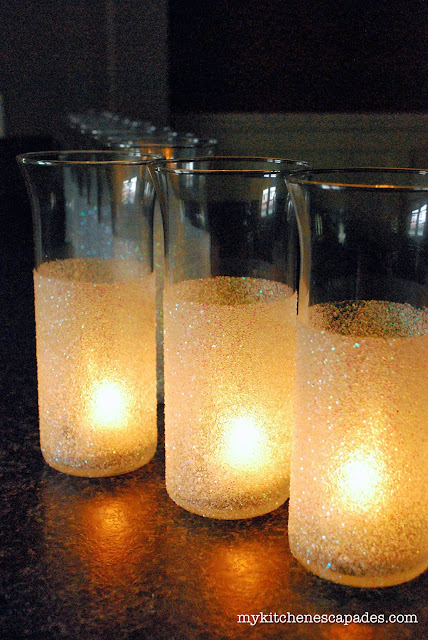
Yes, any color of glitter will work well in this project. I used clear glitter since I wanted the candlelight to shine through. Any glitter will work with this same technique. Just keep in mind that non-translucent glitter will create a glitter vase that will not allow candlelight or twinkle lights to shine through.
Will this work on a ceramic vase?
Yes, you can certainly use a ceramic vase and transform it into a glitter vase. The process would be exactly the same. The only difference would be that the end result is not transparent for a candle or light to shine through. If you have unused vases sitting around, this project will completely transform them.
How to wash a glitter vase
Do not put your glitter vase into the dishwasher. Unfortunately, they are not dishwasher safe but that doesn’t mean you can’t get them clean. The inside can be hand washed and the outside can be wiped off with a damp cloth.
Does the Mod Podge dull the glitter?
Mod Podge is a bit of magic for DIY projects like this glitter vase. It dries completely clear and does not dull the glitter at all. While I used a matte Mod Podge, you can also purchase a high gloss Mod Podge for even more shine to the finished product. Please note, even though the high gloss version says it is dishwasher safe, I would not put these in the dishwasher.
Help! The glitter came off when I removed the tape.
It is important to remove the painter’s tape right after the topcoat of the Mod Podge is applied. If you wait until the top coat dries, it is likely you will pull off some of the glitter along with the tape. Forgot to remove the tape in time? Use a sharp razor blade and gently run it along the edge of the tape to create a crisp line in the dried Mod Podge. If you still have some uneven spots, use a fine brush and some extra glitter to fill them in.
If you happen to get some Mod Podge under the tape as I did, just let it dry completely. Once dry, use your fingernail or another hard surface to gently scrape it away.
Don’t think you have to limit yourself to just using these vase centerpieces for a wedding. They look gorgeous all decked out for the holidays as a Christmas vase as well.
Just so you could see the effect, I put a few tea candles at the bottom of these three. For the wedding, we will use battery-powered tea lights at the bottom of each of the centerpieces. Then fill them with all sorts of gorgeous stuff! You will have to come back to see what all that gorgeous stuff is 🙂
I have a whole series on throwing a wedding on a budget that is simply gorgeous! You can see all 16 different articles by clicking here.
Looking for More DIY Wedding Decor?
If this gorgeous and inexpensive glass vase tutorial was just what you were looking for, be sure to check out these other three articles to help save money on your wedding!


Looking for more than wedding decor? Subscribe to My Kitchen Escapades to get new recipes and resources delivered straight to your inbox! You can also stay in touch on TikTok, Instagram, Facebook, Pinterest, and YouTube for all the latest updates!
**My friend, this post contains Amazon affiliate links which means I receive a small compensation, at no additional cost to you. If you decide to give this project a try, I will be your bestie if you use the links from this post. And no worries….I only link to products that I both use and love! ~Carole


107 comments
Can we spray with hair spray instead of mod podge???
Jessica – You could certainly try that but if it gets even a little bit of moisture or humidity, that hairspray will not hold. If you try it, please come back and share with us how it went! -Carole
I made these today but you can see the lines from the brush strokes. Any suggestions? Did I not out enough mod podge on?
Stacey- I’m not quite sure what you mean by seeing the lines. If it isn’t as covered in glitter as you would like, do as the directions instruct and add more mod Podge and more glitter.
How long will it take for the first round to dry (before I add the second thinner layer?)
Thanks!
Depends on humidity, temperatures and how thick your mod podge is. You will know it is dry because it is no longer white. Around 1-2 hours.
OMG These are soooo pretty!!! I think I am going to try them with Orange and Purple glitter (if I can find it)
That sounds like such a fun color combo! -Carole
These are beautiful! I am thinking of combining these with the glittery branches (Epsom Salts) as a centerpiece for a winter party I am having next weekend. Ii would alternate the branches with the candle’s. What did you end up putting in the candles holders on top of the tea lights?
I did exactly as you are thinking!! I made a bunch of ice coverws branches using epsom salts….it is another post on here. I also used some big flowers in each vase with the branches. At the bottom of each one was a battery powered candle. They were beautiful when the lights were down
Could you please send me a picture of your vases once filled? Thanks!
Carole, will you please send me a picture of your filled vases also and let me know where I can purchase those battery powered candle? I think your vases are beautiful. Any suggestions on how I can incorporated them with my daughters sweet 16 masquerade party?
Could you use glitter paint or glitter spray paint instead? I really love these!
Daphne- sure, you could use either but obviously your result will be different. Depending on the paint, you may not be able to see through them enough if you wanted to light thw inside of the vases.
[…] Read the post here: DIY Glitter Vase […]
Hi Carole,
I love your blog, and would like to share it on a landing page I am making for louisville, ky brides. Please let me know if you have any problems with it and I will take you down, if not happy to share your crafty ideas with others!
Thanks,
Rachel
Thanks Rachel! As long as you direct them to here and noy republish my content, that would be wonderful.
If i washed them, the glitter wont come out?
Claudia- great question! If you gently hand wash these, you will be fine
Do u have a picture of them after u filled them up???
I do have one Quala! I will email it to you because I can’t attach a photo in this comment section -Carole
Hi…I loved your idea. Can you please email me a pic of all the goodies you included?
Absolutely
Could you email a photo also? I am looking for ideas for our 25th wedding anniversary (renewing our vows!)
Thank you so much!
Could you also email me a pic of the filled centerpieces? Thanks.
Can you please send me a picture too I loveee what you do
Hi Carole ! I am thinking of this for my daughters sweet sixteen . Can you send me a picture of the centerpiece completed with the branches and flowers