
Ingredients
Scale
- 3 eggs
- 3/4 cup sugar
- 1 stick (half cup) melted butter, cooled
- 1 cup flour
- 1 teaspoon vanilla
- 2 teaspoon black gel food coloring
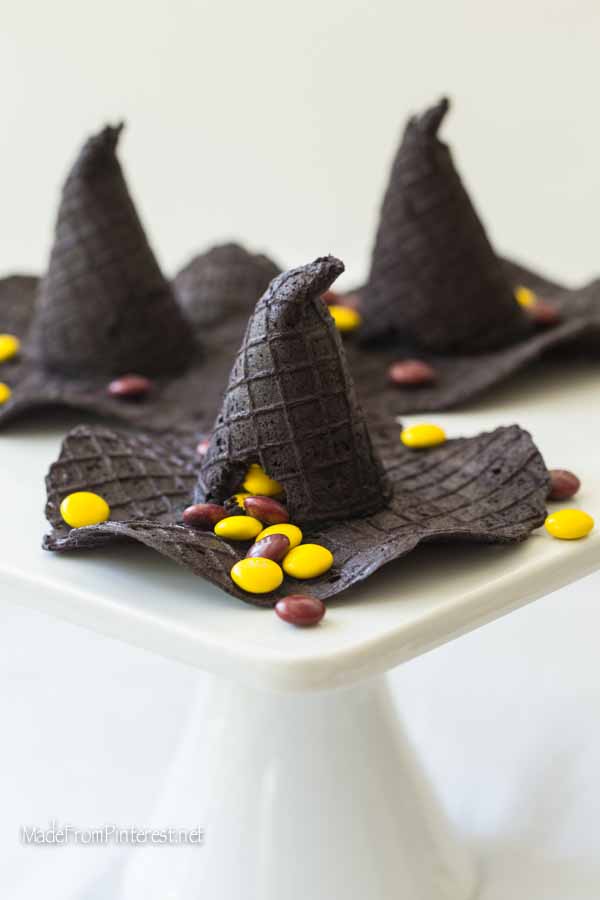
- Colored Candies to fill the hat
- Black decorating icing
Instructions
- Directions:
- Whisk eggs. Add sugar and continue whisking until light yellow and well combined. Add melted butter and flour. Whisk until it is free of lumps, add vanilla and food coloring. Mix well.
- Next, follow manufacturers directions to make cones, BUT undercook them! 40 seconds worked best for me. Otherwise they get to crisp to pinch and bend the top of the cones. The cones will be very hot. I used a spatula or a kitchen knife to remove them from the cone maker. Lay a towel on the counter as a work surface.
- For the cones:
- Three small cookies scoops was the perfect amount for my waffle cone maker to make a full size cone. To make the hats, make full size circles and cut them in half. Then lay one half back onto the heated plate to keep it soft and pliable. On one corner, put a dab of black decorating icing. Take your cone form with the tip along the straight edge and begin rolling at the icing free edge of the cone along the form, keeping edges even, towards the dab of icing. You may want to use a towel or cloth as the cone will be hot. The dab of icing helps the cone hold tightly. Slide the form out of the cone slightly, pinch the top of the cone and hold in place with a kitchen towel. Remove the form. Cool for 50 seconds to a minute. Repeat with the other half.
- For the brims:
- Lay five large spoons in a circle, with the handles out. Make a cone with two scoops of dough for a smaller circle. Lay the circle on the five spoon. Lay the handle of a knife in between each spoon to create an undulating edge. Cool 50 seconds to one minute.
- To assemble the hats:
- Turn the cone upside down and fill with candy. Pipe decorating icing along the rim of the hat. Place the brim of the hat over the cone and press into place. Turn the hat over and let icing harden for about 20 – 30 minutes before serving.
- Notes:
- Each full size cone (3 scoops of dough) makes two hats. You will need 5 full size cones for 10 hats.
- Each small cone (2 scoops of dough) makes one brim. You will need 10.
- Make sure to handle the hats from the base. If picking up the hat from the cone, the brim may fall off.
- If ordering specialty colored candy, 7 ounces of each color will be plenty.
- These are best fresh, but the cones and brims may be made 1 or 2 days ahead and kept in Ziploc bags or an airtight container.